The C-C facesheets were joined to 2-lb/ft3 -aluminum honeycomb to make the sandwich panels. The procedures used were similar to those for the construction of honeycomb-reinforced aluminum facesheet panels and will not be covered in this paper. Three types of inserts were used: a 0.250-28 THD insert, a #10-32 THD insert and a blank insert. The blank insert was drilled through to provide holes for the attachment bolts that secure the radiator panel to the frame of the spececraft. Figure 7, shows one of the panels being prepared for insertion of the potting compound along the outside insert locations. Figure 8, shows the edge of the panel after consolidation of the facesheets with the honeycomb core. The potting compound for the edge holes is clearly visible. The interior and exterior surfaces of one of the radiator panels, after installation of the inserts and the application of the silver Teflon tape, are shown in figures 9 and 10.

fig.7.8.9.10-
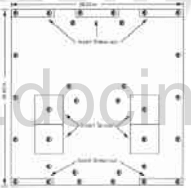
The mechanical tests planned for the Honeycomb panel include insert pullout, flatwise tension, pin bearing-blind inserts, and facesheet/core shear. Figure 11 shows the location of the test specimens from the panel. The flatwise tensile and facesheet/core shear test specimens were cut from the clearareas of the panel.

fig.11-layout of test specimens from the radiator panel for dstrucitve testing
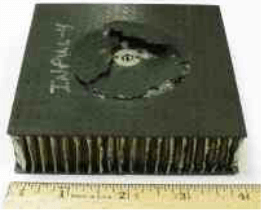
The insert pullout test was conducted by Lockheed Martin astronautics. The inserts tested had a diameter of 0.56 inches, Table V lists the test results. The minimum pullout load was 550 lbs. and the maximum was 1276 lbs. The large size of the plugs pulled out reflected the size of the regions around the inserts that had been filled with potting compound. The design load for pulling out the inserts is about 50 lbs. Even the weakest specimen had a factor of 10 over capacity in the normal direction. Figure 12 shows a photo of specimen inPul-4 after failure. The large region of material pulled out with the insert is clearly visible.

fig.12-Post-test photo of insert pull out test specimen InPul-4
Flatwise tensile tests were conducted on the honeycomb sandwich using ASTM Standard C297-94. The results of the test are given in Table VI. The average measured strength was 429 lbs. with a standard deviation of 27 lbs. The failures were in the bond line at the aluminum honeycomb core and C-C interface.
Insert bearing tests were conducted using the configuration shown schematically in figure 13. Each specimen was prepared with the c/d ratio of 1.0. The average bearing load was 336.3 lbs. with the standard deviation of 59.9 lbs. The large scatter was primarily due to the core fill diameter around each insert varying from 0.8 to 1.0-in. The failure was tensile in nature as the insert the core fill acted as a large effective insert to an applied tensile load. The calculated average failure stress value of approximately 17 ksi is quite comparable with the tensile strength of the 0.020-in. P30X/C laimnate.

table.V-results of the Sandwich insert pullout test

fig.13-schematic of pin bearing test configuration